Scalable Vector Shapes 2D
by renevanderark
Scalable Vector Shapes 2D plugin for Godot 4.4
Scalable Vector Shapes 2D lets you do 3 things:
- Draw seamless vector shapes using a Path Editor inspired by the awesome Inkscape with a new node type:
ScalableVectorShape2D1 - Animate the shape of the curve using keyframes on a property-track in an
AnimationPlayer - Import .svg files as seamless vector shapes in stead of as raster images2
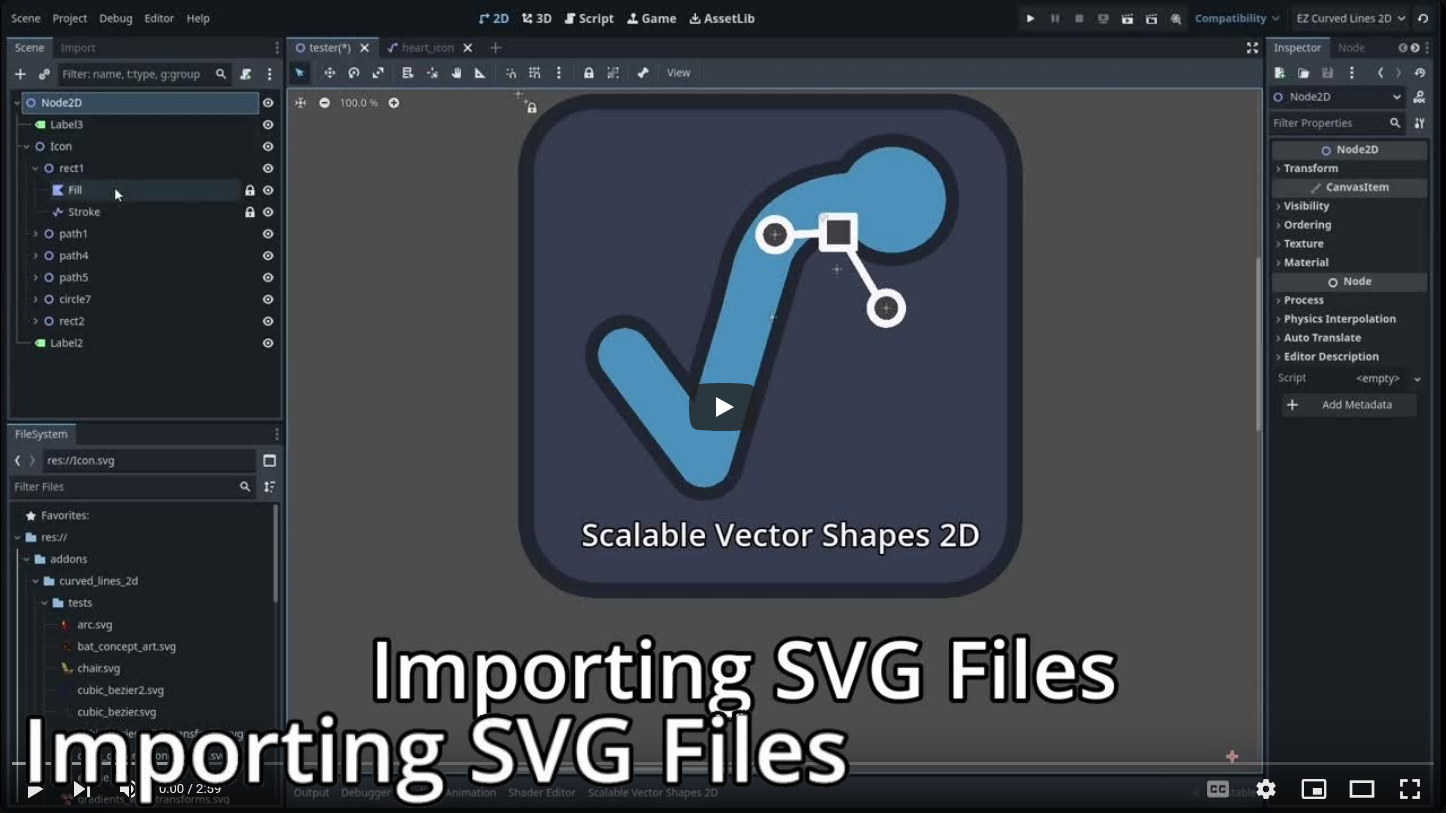
Watch the A-Z explainer on Youtube
In this 10 minute video I explain how to use all the features of Scalable Vector Shapes 2D in short succession:
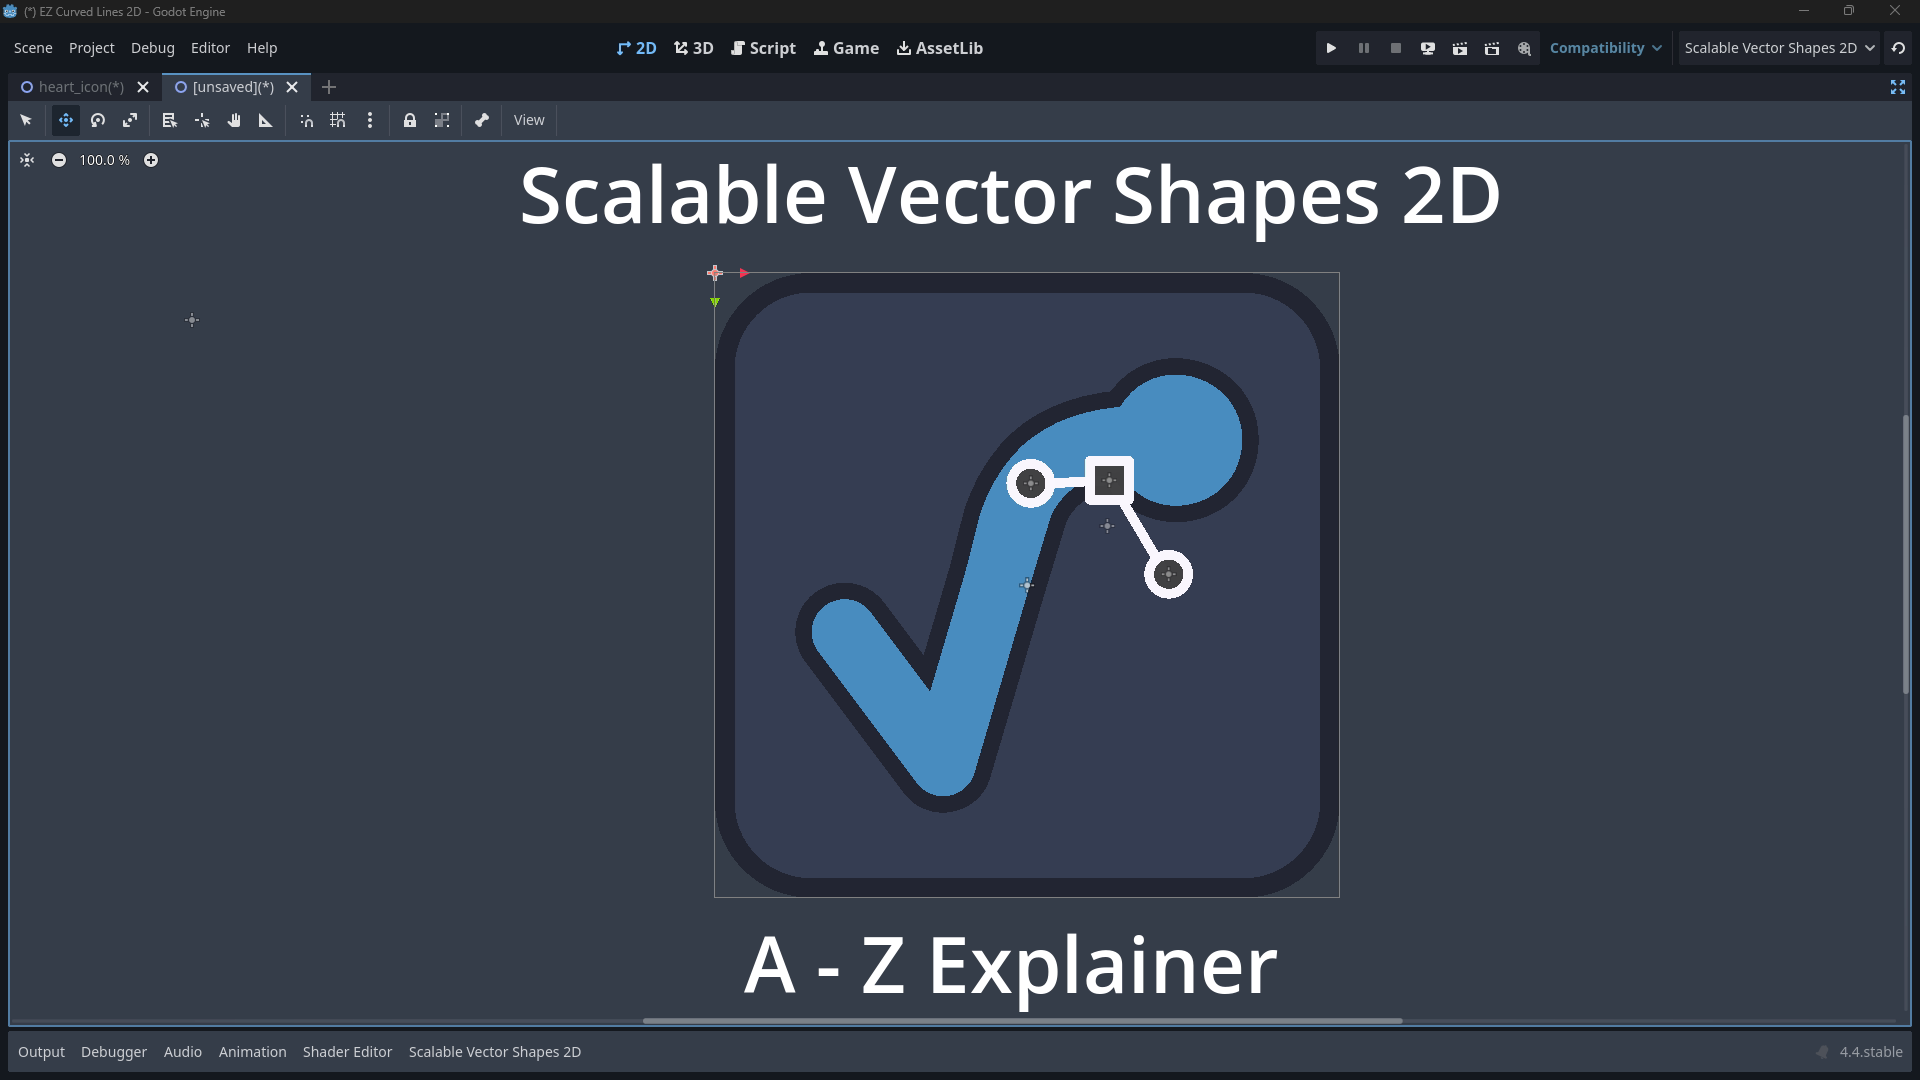
Table of Contents
- Scalable Vector Shapes 2D plugin for Godot 4.4
- Table of Contents
- Drawing Shapes in the Godot 2D Viewport
- Generating a Circle, Ellipse or Rectangle using the bottom panel item
- Using the
.svgimporter - Manipulating shapes
- Adding a point to a shape
- Bending a curve
- Creating, mirroring and dragging control point handles
- Closing the loop and breaking the loop
- Deleting points and control points
- Setting the global position of a point / curve handle manually
- Create a cutout shape (a hole)
- Converting a line segment into an arc-segment
- Editing arc properties
- Setting the pivot of your shape
- Manipulating gradients
- The Project Settings in the Scalable Vector Shapes panel
- Ways to prevent 'over-selecting'
ScalableVectorShape2Dnodes - Using the Inspector Form for
ScalableVectorShape2D - More about assigned
Line2D,Polygon2DandCollisionObject2D - Animating / Changing shapes at runtime
- FAQ's
- Attributions
- Reaching out / Contributing
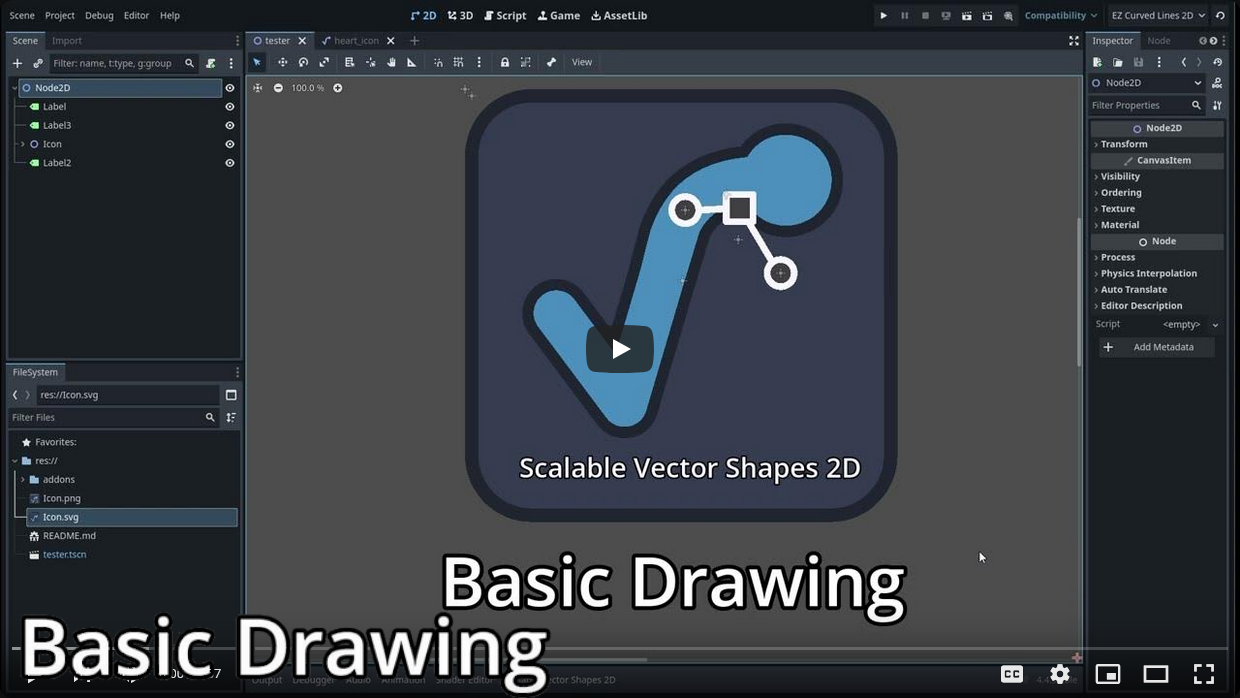
Drawing Shapes in the Godot 2D Viewport
Basic Drawing Explainer on youtube
After activating this plugin a new bottom panel item appears, called "Scalable Vector Graphics".
There are 2 recommended ways to start drawing:
- Creating a Circle/Ellipse, Rectangle or empty Path using the bottom panel item
- Using the
.svgimporter
Generating a Circle, Ellipse or Rectangle using the bottom panel item
The Scalable Vector Shapes bottom panel gives you some basic choices:
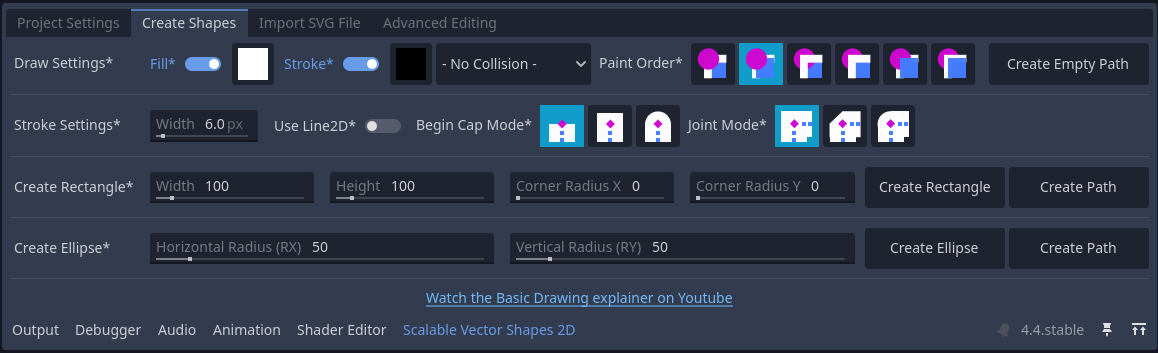
Creating Paths based on Bézier curves
Pressing the Create Empty Path or one of the Create Path buttons will add a new shape to an open 2D Scene in 'Path' mode, meaning all points in the 'Bézier' curve are editable.
Creating 'primitive' scapes: Rectangle and Ellipse
It's probably easier to start out with a basic primitive shape (like you would in Inkscape <3) using the Create Rectangle or Create Ellipse button. This will expose less features, but will make it a lot easier to manipulate shapes:
Ellipses will only have one handle to change the size property with (representing the x and y diameter). This will set the rx and ry property indirectly.
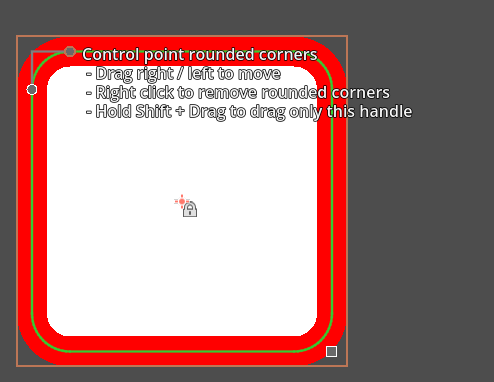
Rectangles will have a handle for size and 2 handles for rounded corners rx and ry property.
Using the .svg importer
As mentioned in the introduction, the .svg import supports a small - yet relevant - subset of the W3C specification.
That being said, it's still pretty cool and serves my purposes quite well. You can drag any .svg resource file into the first tab of the bottom dock to see if it works for you too:
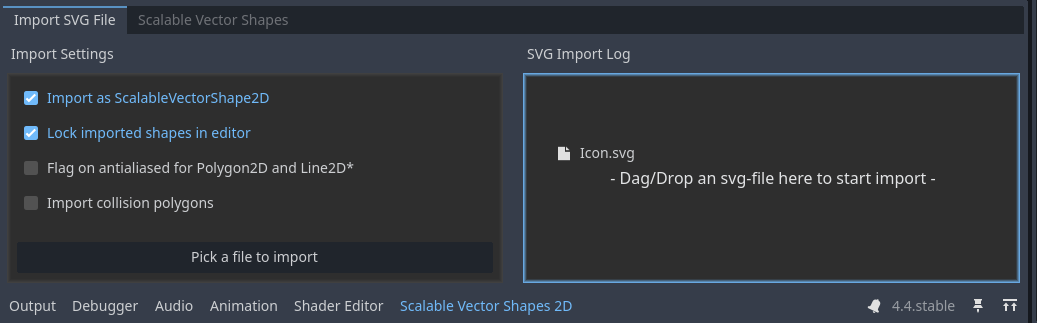
On the left side of this panel is a form with a couple of options you can experiment with. On the right side is an import log, which will show warnings of known problems, usually unsupported stuff:
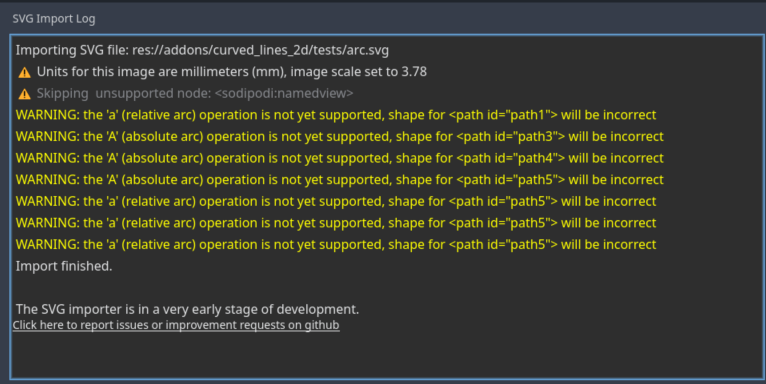
As the link in the log suggest, you can report issues on github; be sure to check if something is already listed.
Don't let that stop you, though, your future infinite zoomer and key-frame animator will love you for it.
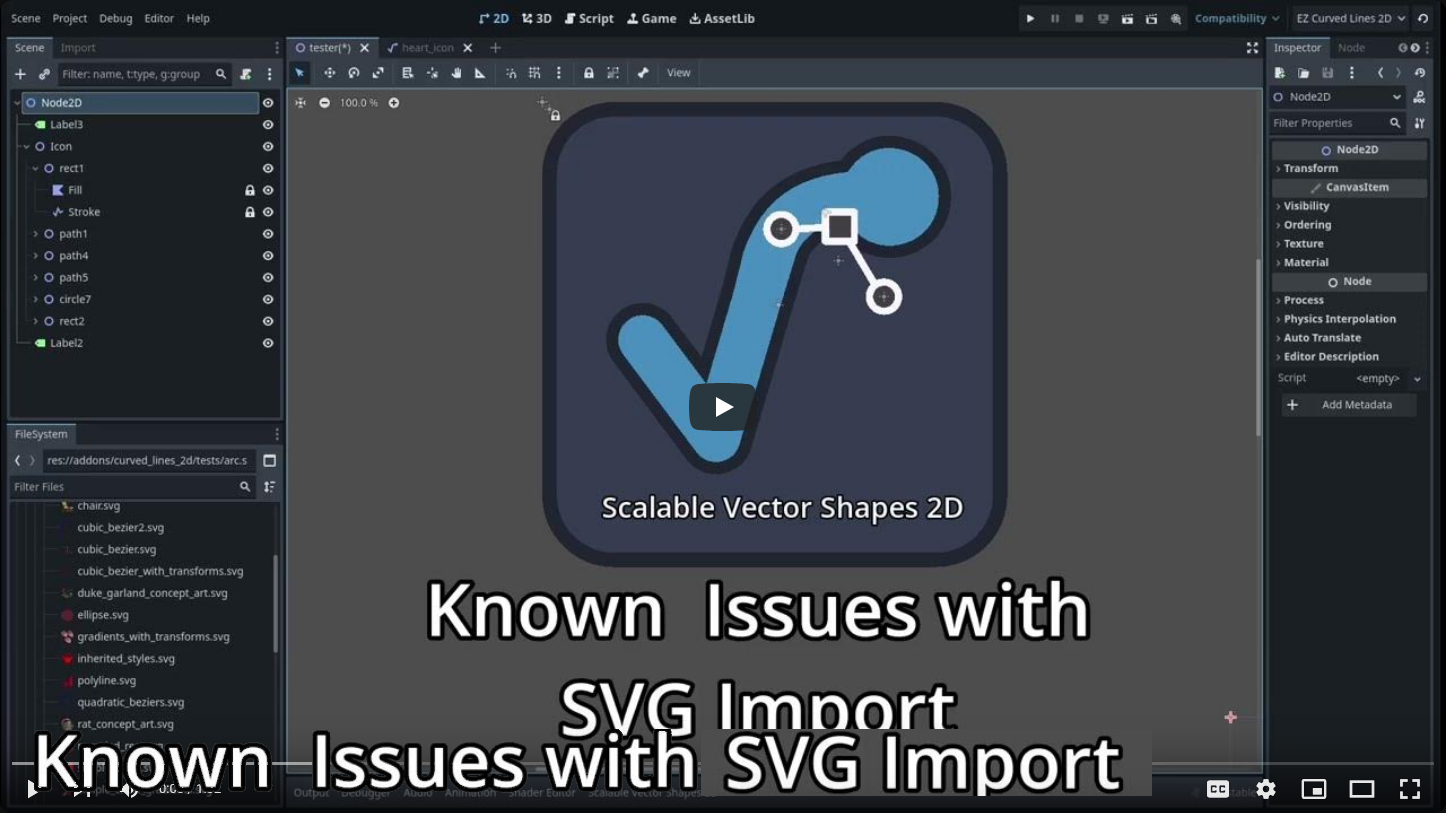
Known issues explainer on Youtube:
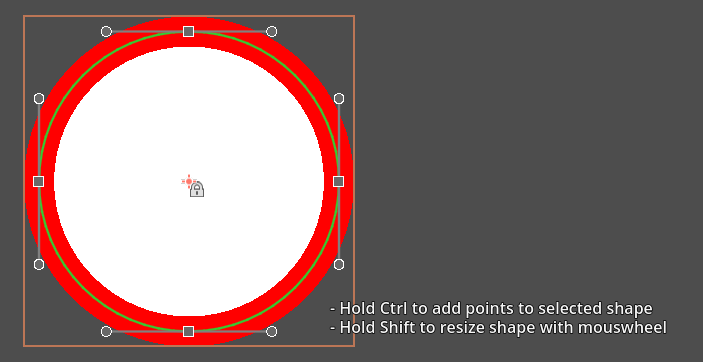
Manipulating shapes
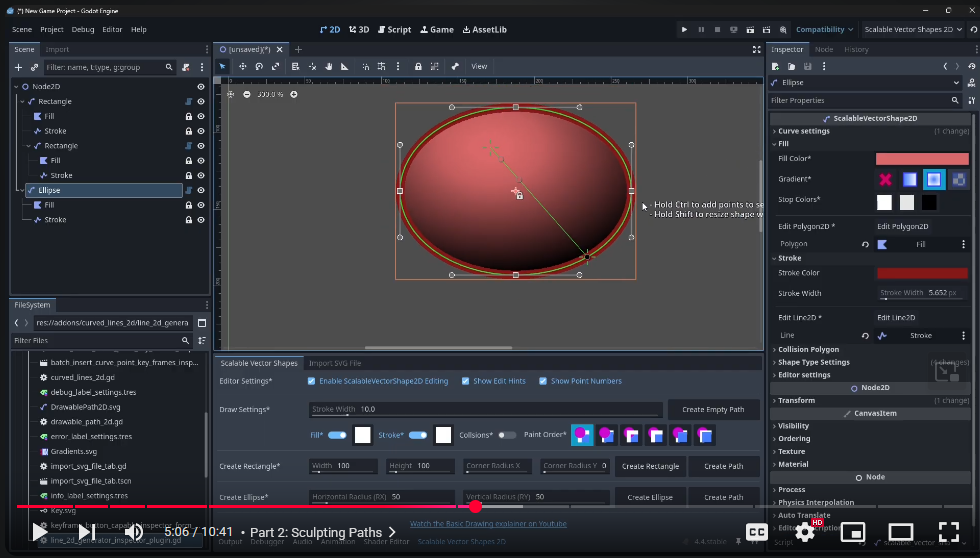
The hints in the 2D viewport should have you covered, but this section lists all the operations available to you. You can also watch the chapter on sculpting paths on youtube:
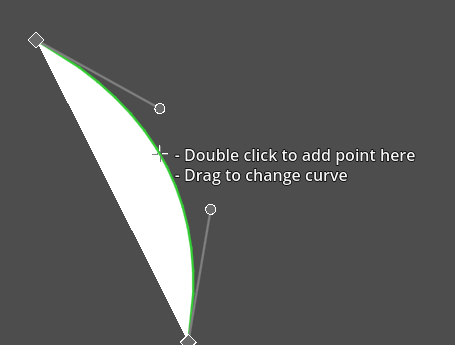
Adding a point to a shape
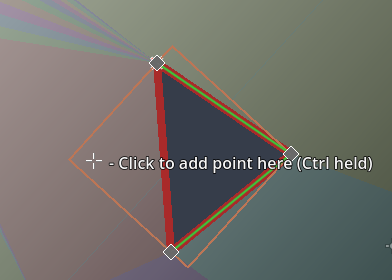
Using Ctrl3 + Left Click you can add a point anywhere in the 2D viewport, while your shape is selected.
By double clicking on a line segment you can add a point inbetween 2 existing points:
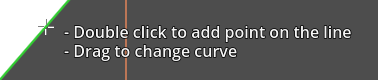
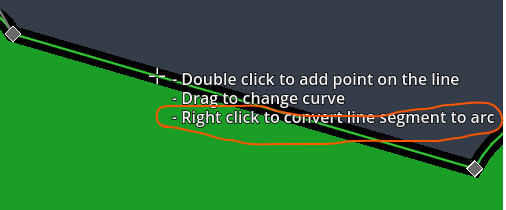
Bending a curve
Holding the mouse over line segment you can start dragging it to turn it into a curve.
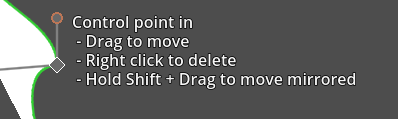
Creating, mirroring and dragging control point handles
When you have new node you can drag out curve manipulation control points while holding the Shift button. The 2 control points will be mirrored for a symmetrical / round effect.
Dragging control point handles while holding Shift will keep them mirrored / round:

Dragging them without holding shift will allow for unmirrored / shap corners:
Closing the loop and breaking the loop
Double clicking on the start node, or end node of an unclosed shape will close the loop.
Double clicking on the start-/endpoint again will break the loop back up:
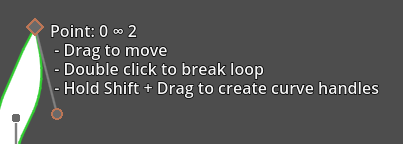
You can recognise the start-/endpoint(s) by the infinity symbol: ∞
Deleting points and control points
You can delete points and control points by using right click.
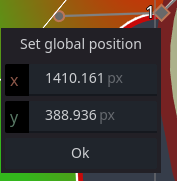
Setting the global position of a point / curve handle manually
Using Alt+Click you can now open a form to set the global position of a point manually:
Create a cutout shape (a hole)
Using Ctrl+Shift+Click3 on your selected shape will create and select a new ScalableVectorShape2D which will act as a cutout (a hole / scissors if you will):
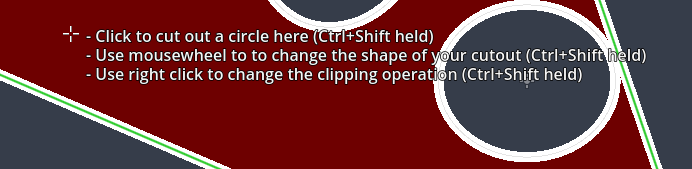
The created cutout will have only one point, so to see the effect you'd need to add more points to using regular Ctrl+Click3:
Converting a line segment into an arc-segment
Use Right click on a line segment to convert it into an arc4 (a an ellipse-shaped bend with an x- and y-radius).
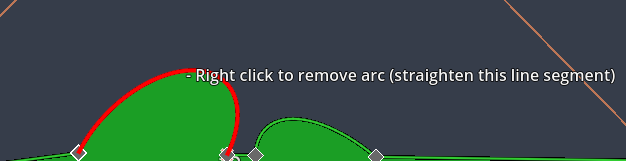
Use Right click on an arc again to convert it back into a normal line segment.
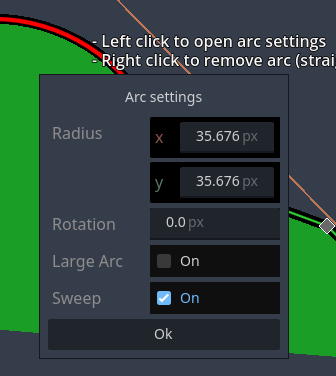
Editing arc properties
Using Left click on an arc segment opens a popup form to edit the properties of the arc:
- radius (
rx/ry) - rotation (rotates the arc around its elliptical center; is only noticable when radius is non-uniform)
- large arc (when the arc's radius is greater than distance between its start- and endpoint it can be drawn the short and the long way 'round)
- sweep (determines the direction the arc points are drawn: clockwise / counter-clockwise; this effectively flips the arc)
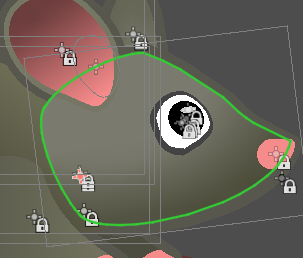
Setting the pivot of your shape
You can use the Change pivot mode to change the origin of your shape, just like you would a Sprite2D. In this case, the 'pivot' will actually be the position property of you ScalableVectorShape2D node.
This rat will want to rotate it's head elsewhere:
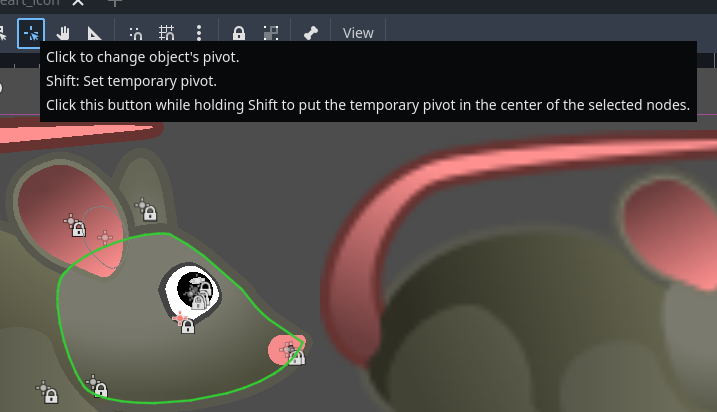
Like this:
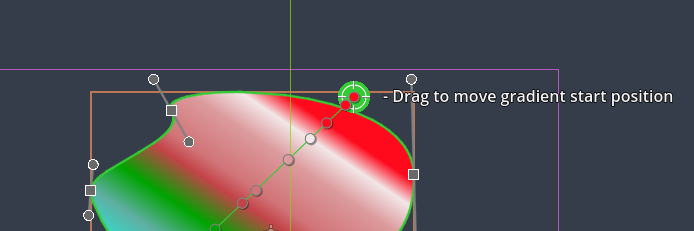
Manipulating gradients
Once a gradient is assigned to the 'Fill' of your shape via the inspector, its properties can be changed using the same controls as will the other handles.
Changing the start- and endpoint of the gradient
Drag the outer orbit of the start- and endpoint of a the gradient line using the left mouse button to move them:
Changing the color stop positions
Drag the color stops along the gradient line to change their position.
Right click to remove a color stop.

Add new color stops
Double clicking on the gradient line will add a new color stop (the assigned color will be sampled from the existing color at that point)

The Project Settings in the Scalable Vector Shapes panel
A couple of settings in the bottom panel are stored across sessions to represent your preferences:
- Editor settings (how the 2D Viewport should behave):
- Enable/Disable ScalableVectorShape2D Editing (when checked off, you can edit nodes the normal, built-in, godot-way. You are going to need this)
- Show/Hide Edit hints
- Show Point Details (which are the exact indices of each point on the
Curve2Dof this shape, what is it's global position) - Snap to Pixel (snaps points and curve handles to whole pixels on the global transform, only when
shape_type == ShapeType.Path) - Snap distance (the snap step / resolution)
- Draw Settings:
- Stroke Width
- Enable/Disable Fill (when creating new shapes via the bottom panel)
- Fill color (when creating new shapes in the bottom panel)
- Enable/Disable Stroke (when creating new shapes via the bottom panel)
- Stroke color (when creating new shapes in the bottom panel)
- Choose a
CollisionObject2Dtype (when creating new shapes via the bottom panel, default is no collision object assignment)
- Paint order: a toggle which represent what comes in front of what (when creating new shapes in the bottom panel)
Ways to prevent 'over-selecting' ScalableVectorShape2D nodes
This plugin can sometimes get in the way of the default 2D viewport behavior. Sometimes it is hard not to select a ScalableVectorShape2D.
There are 4 ways to get around this:
- Locking the
ScalableVectorShape2Dusing the lock toggle button above the 2D viewport
 - Hiding the
ScalableVectorShape2Dvia the scene tree - Saving the branch containing the
ScalableVectorShape2Das a new scene via the scene tree and importing it will also prevent selection - Toggling off Enable/Disable ScalableVectorShape2D Editing altogether in the bottom panel
Using the Inspector Form for ScalableVectorShape2D
The following custom forms were added, with extensive tooltips to help explain the actual functions they provide:
- Convert to Path button
- Export as PNG button
- Fill (actually the assigned
Polygon2D) - Stroke (actually the assigned
Line2D) - Collision (manages an assigned
CollisionObject2D) - Navigation (manages an assigned
NavigationRegion2D) - Curve Settings
- Masking
- Shape Type Settings
- Editor Settings
Inspector Form
Convert to Path button
When a primitive shape (basic rectangle or ellipse) is selected, a Convert to Path-button is available at the top of the inspector.
Export as PNG button
With the Export as PNG-button you can save any ScalableVectorShape2D and its children as a new .png-file. Note that nodes which are assigned as Fill or Stroke that are higher up in the hierarchy will be excluded from the exported file.
You can however change the type of any Node2D to ScalableVectorShape2D temporarily in order to export group of shapes as a PNG file.
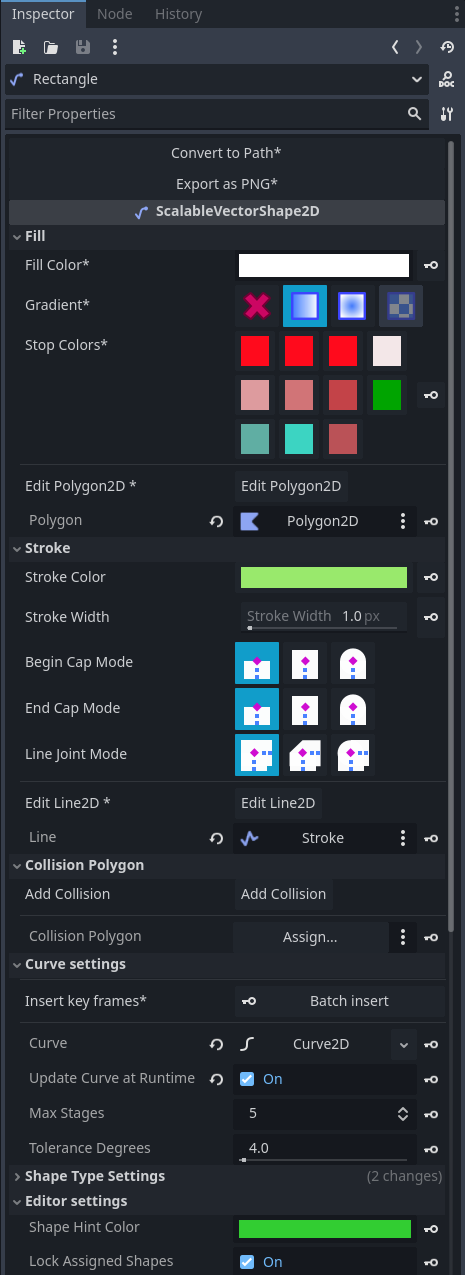
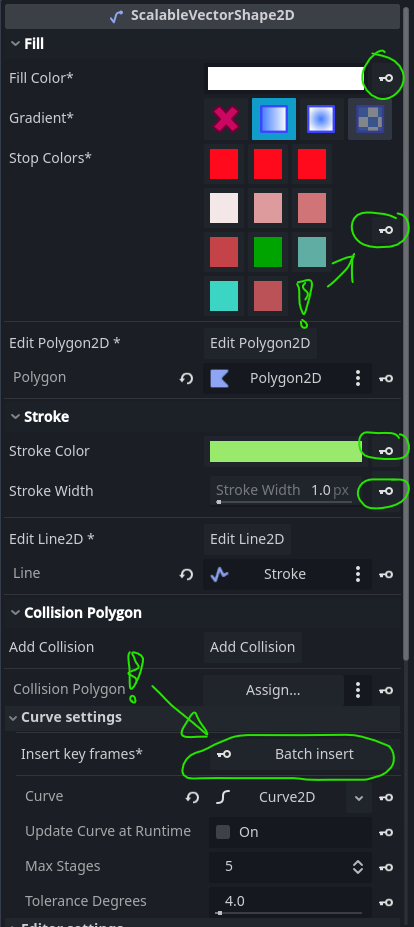
The Fill inspector form
When the selected shape has no fill, an Add Fill button is provided. Clicking that will create and assign a new Polygon2D to the selected ScalableVectorShape2D:

Once assigned, the following options are available:
- Fill color, changes the
colorproperty of the assignedPolygon2D - Gradient, will assign or remove a
GradientTexture2Dto thePolygon2D - Stop colors (if a gradient is set), one color button per color
- A
Edit Polygon2Dbutton, which will make the editor select the assignedPolygon2D
Below that, a standard godot Assign ...-field is also available to set the polygon-property directly with and to enable unassignment.
The Stroke inspector form
When the selected shape has no stroke, an Add Stroke button is provided. Clicking that will create and assign a new Line2D to the selected ScalableVectorShape2D:
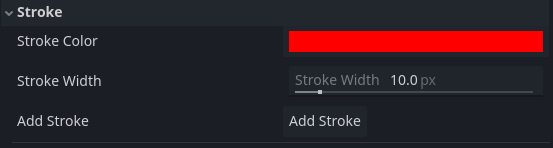
Once assigned, the following options are available:
- Stroke color, changes the
default_colorproperty of the assignedLine2D - Stroke width, changing the
widthproperty of the assignedLine2D
Below that, a standard godot Assign ...-field is also available to set the line-property directly with and to enable unassignment.
The Collision inspector form
This works the same as the Fill- and Stroke forms, but in this case a descendant of a CollisionObject2D is assigned to the collision_object-property5:
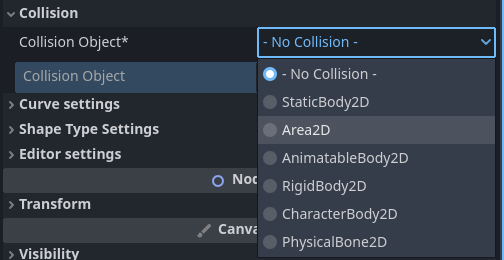
Every time the shape is changed, one or more Polygon2D nodes will be added/updated as direct children of this collision_object. The descendants of CollisionObject2D are:
StaticBody2DArea2DAnimatableBody2DRigidBody2DCharacterBody2DPhysicalBone2D
The Navigation inspector form
This form can hold a reference to an assigned NavigationRegion2D. When the shape changes, a new navigation polygon is calculated.
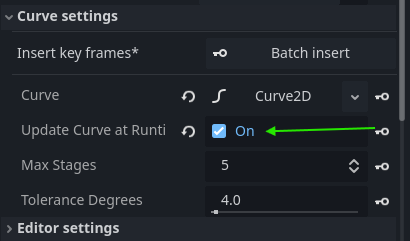
The Curve settings inspector form
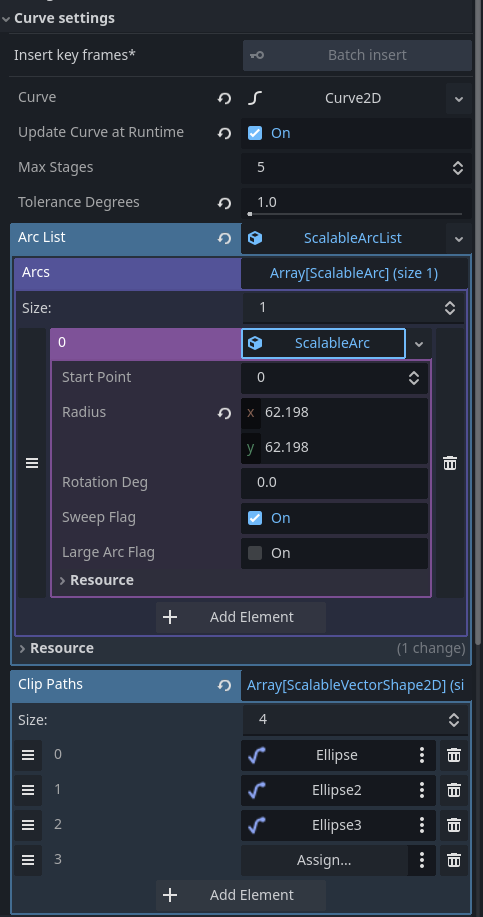
The curve settings inspector form provides the following options
- A
Batch insertkeyframes button for all theCurve2D's control points (the whole shape). This will be active when a valid track is being edited in aAnimationPlayervia the bottom panel - The standard godot built-in editor for
Curve2Dresources, assigned to thecurveproperty of the selectedScalableVectorShape2D - The
update_curve_at_runtimecheckbox, which enables animating the entire shape - The
max_stagesproperty which influences smoothness (and performance!) of curve drawing; a higher value means smoother lines - The
tolerance_degreesproperty, which also influences smoothness (and performance) of curve drawing: a lower value adds a smoother curve, especially for very subtle bends - The
arc_listproperty: a container for the metadata-objects describing elliptical arc segments of the curve (implemented viaScalableArc2DandScalableArcListresource-classes).
The Masking Inspector form
These properties are used for clipping this shape and cutting out of this shape.
- The
clip_pathsproperty: an array of assignedScalableVectorShape2D-nodes, which describe the shape to cut out of this shape - When the
use_interect_when_clippingproperty is checked on and thisScalableVectorShape2Dis used in another's clip_paths array, theGeometry2D.intersect_polygons(...)operation is used in stead of theGeometry2D.clip_polygons(...) operation
The Shape type inspector form
This form allows manipulation of the properties of primitive shape types (rectangle, ellipsis):
- Shape type, here you can selected the type of the shape: Path, Rect and Ellipse. (Be warned: changing a shape from a path to a primitive shape is a destructive action and cannot be undone)
- Offset: this represents the position of the pivot relative to the shape's natural center.
- Size: the box size of the entire shape (stroke thickness excluded)
- Rx: the x-radius of the shape
- Ry: the y-radius of the shape
It is best to change these properties via the handles in the 2D editor. They are, however, quite useful for animating key frames.
The Editor settings inspector form
This form exposes 2 settings:
- Shape Hint Color: the color of the line with which this shape is drawn, when selected
- Lock Assigned Shapes: when this is checked, added strokes, fills and collision polygons will be locked in the editor, once created.
More about assigned Line2D, Polygon2D and CollisionObject2D
Using the Add ... buttons in the inspector simply adds a new node as a child to ScalableVectorShape2D but it does not need to be a child. The important bit is that the new node is assigned to it via its properties: polygon, line and collision_object.
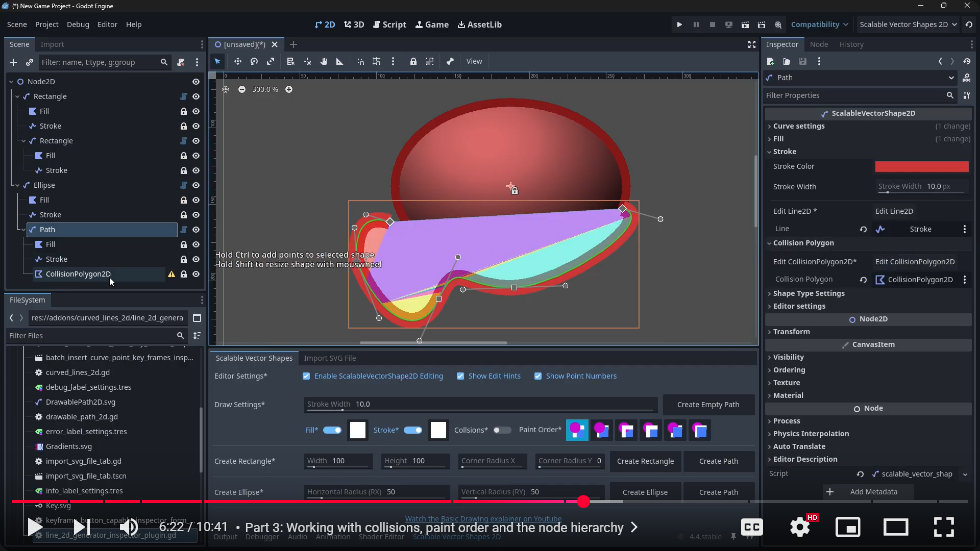
Watch the chapter about working with collisions, paint order and the node hierarchy on youtube
This video gives more context on how Line2D, Polygon2D and CollisionPolygon2D are assigned to the ScalableVectorShape2D:
Animating / Changing shapes at runtime
Youtube explainer on animating
Watch this explainer on youtube on animating:
A note up front (this being said)
The shapes you create will work fine with basic key-frame operations.
You can even detach the Line2D, Polygon2D and CollisionObject2D from ScalableVectorShape2D entirely, once you're done drawing and aligning, and change the ScalableVectorShape2D to a simple Node2D if necessary.
Animating the shape and gradients at Runtime
Sometimes, however, you want your shape to change at runtime (or even your collision shape!)
You can use the Update Curve at Runtime checkbox in the inspector to enable dynamic changing of your curved shapes at runtime.
Add keyframes in an animation player
You can then add an AnimationPlayer node to your scene, create a new animation and (batch) insert key frames for the following:
- The entire shape of your
ScalableVectorShape2D, which are:curve:point_*/positioncurve:point_*/incurve:point_*/outarc_list:arc_*/radiusarc_list:arc_*/rotation_degarc_list:arc_*/large_arc_flagarc_list:arc_*/sweep_flag
- All the gradient properties of your fill (
Polygon2Dassigned toScalableVectorShape2D), which are:texture:gradient:colors(the entirePackedColorArray)texture:gradient:offsets(the entirePackedFloat32Array)texture:fill_fromtexture:fill_to
- Stroke width, i.e.: the
widthproperty of the assignedLine2D - Stroke color, i.e.: the
default_colorof the assignedLine2D - Fill color, i.e.: the
colorof the assignedPolygon2D
Don't duplicate ScalableVectorShape2D, use the path_changed signal in stead
When the update_curve_at_runtime property is checked, every time the curve changes in your game the path_changed signal is emitted.
Duplicating a ScalableVectorShape2D will not make a new Curve2D, but use a reference. This means line-segments will be calculated multiple times on one and the same curve! Very wasteful.
If however you want to, for instance, animate 100 blades of grass, just use one DrawableShape2D and have the 100 Line2D node listen to the path_changed signal and overwrite their points property with the PackedVector2Array argument of your listener func:
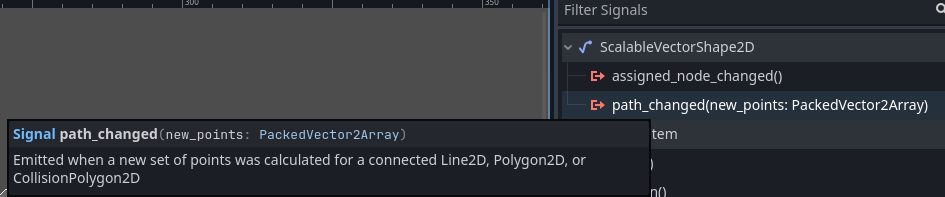
This very short section of the youtube video illustrates how to do this: https://youtu.be/IwS2Rf65i18?feature=shared&t=55
Performance impact
Animating curve points at runtime does, however, impact performance of your game, because calculating segments is an expensive operation.
Under Tesselation settings you can lower Max Stages or bump up Tolerance Degrees to reduce curve smoothness and increase performance (and vice-versa)
FAQ's
Can I draw shapes programmatically?
Yes you can. There are a couple of small things to be aware of:
- You need to set
my_shape.up_date_curve_at_runtime = true - To draw anything, your shape needs a Stroke, Fill, or Collision Object:
- Setting a stroke:
my_shape.line = Line2D.new() - Setting a fill:
my_shape.polygon = Polygon2D.new() - Setting a collision object:
my_shape.collision_object = StaticBody2D.new() - The Stroke, Fill, Collision Object need to be inside the scene tree, i.e.:
my_shape.add_child(my_shape.line)
I added a small example based on this question
Should I draw shapes programmatically?
This depends on the complexity of what you want to achieve.
In many cases just drawing something in the editor and saving it as a scene to import elsewhere (or instantiate() via preloading) is a better option, adhering to the Keep it Simple principle.
But that's just my personal opinion.
Can I change shapes in the 2D editor while running the game?
When the Update Curve At Runtime checkbox is checked, the shape will also sync up with a scene running in debug mode.
Once you're done drawing and do not need the shape to change anymore at runtime you can turn this checkbox off again.
Attributions
Lots of thanks go out to those who helped me out getting started:
- This plugin was first inspired by Mark Hedberg's blog on rendering curves in Godot.
- The suggestion to support both
Polygon2Dand collisions was done by GeminiSquishGames, who's pointers inspired me to go further - The SVG Importer code was adapted from the script hosted on github in the pixelriot/SVG2Godot repository
- The code for making cutout shapes was adapted from the great knife tool plugin by @mrkdji
And a big thank you goes to to @MewPurPur
The author of GodSVG for writing a great SVG Arc command implementation I could reuse here:
- Download from the GodSVG website
- Or try out the web version
- Also on itch.io
And of course everyone who helped test and review the code thus far
Reaching out / Contributing
If you have feedback on this project, feel free to post an issue on github, or to:
- Ask a question on reddit
- Follow my channel on youtube: @zucht2.bsky.social
- Contact me on bluesky: @zucht2.bsky.social.
- Try my free to play games on itch.io: @renevanderark.itch.io
If you'd like to improve on the code yourself, ideally use a fork and make a pull request.
This stuff makes me zero money, so you can always branch off in your own direction if you're in a hurry.
Footnotes
-
Looking for EZ Curved Lines 2D? The renamed plugin deprecates the old
DrawablePath2Dcustom node in favor ofScalableVectorShape2D. A Conversion button is provided: converter button. The reason is thatScalableVectorShape2Dinherits directly fromNode2Dgiving much more control to the plugin over how you can draw. ↩ -
Important sidenote: This plugin only supports a small - yet relevant - subset of the huge SVG Specification ↩
-
Arcs are implemented the same way as specified by the w3c for scalable vecor graphics. ↩
-
Note that the
collision_polygonproperty ofScalableVectorShape2Dremains supported for backward compatibility, even though the inspector form will now show a deprecation warning and suggest replacing it by assigning aCollisionObject2Dto thecollision_objectproperty. ↩
Download
Support
If you need help or have questions about this plugin, please contact the author.
Contact Author